
When the technicians have finished their work on site the mobile app sends all of the job data back to the office system so that you can check & complete the jobs as soon as possible – so you can raise the invoice quicker & ultimately get paid faster.
Finding Jobs that are ready to Complete
- When a job is completed on the mobile app, if there are no problems with the visit and there is no further work identified the job status updates to ‘Ready to Complete’ to indicate to the user that they can now go ahead and complete this job.
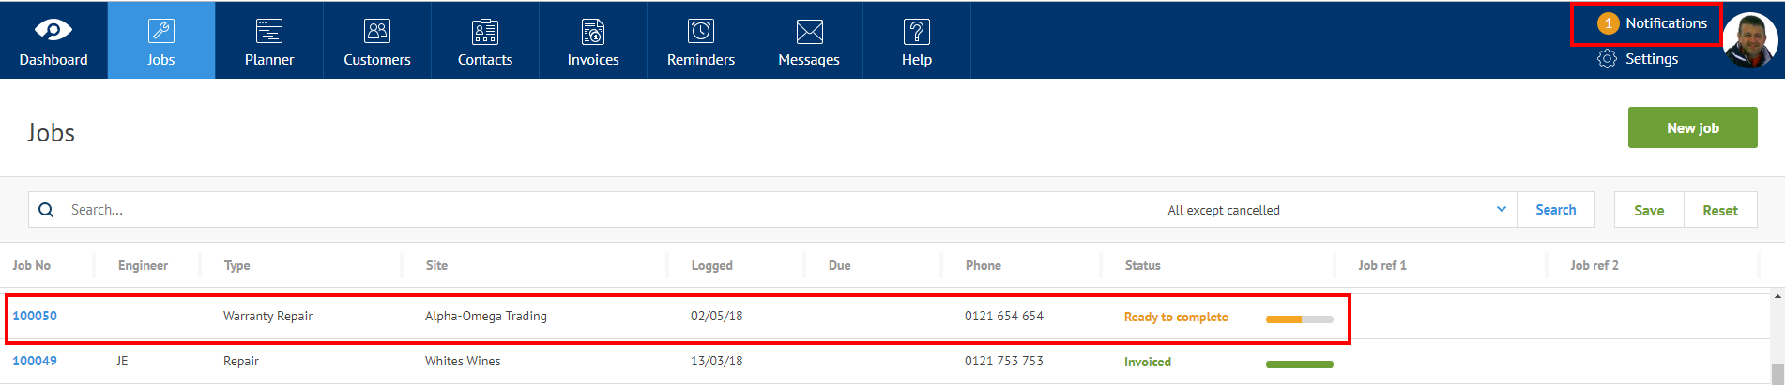
- An automatic message is created, with a notification, to let the job controller know that the job has been done and can now be completed.

- Alternatively, to pull up a list of jobs that are ready for you to check & complete simply click on the Jobs icon on the menu bar to open the Jobs list.
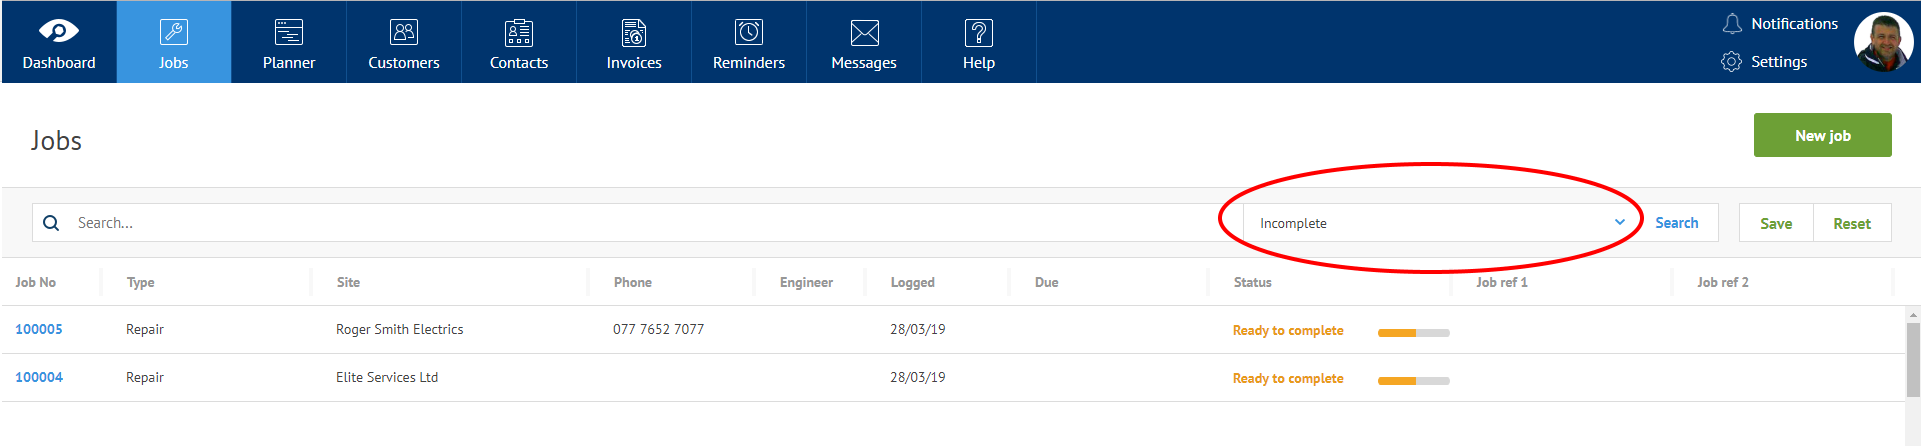
- Then select ‘Incomplete’ from the pre-defined filters on the right. This will limit the list of jobs to just show you the ones that engineers have finished with and that are ready for you to check, complete & invoice.
Checking & Completing Jobs
- Click the job number of the job you want to check & complete. The job will open for editing.
- Review the Labor & Materials tabs to check the details that the technician has entered via his mobile device.
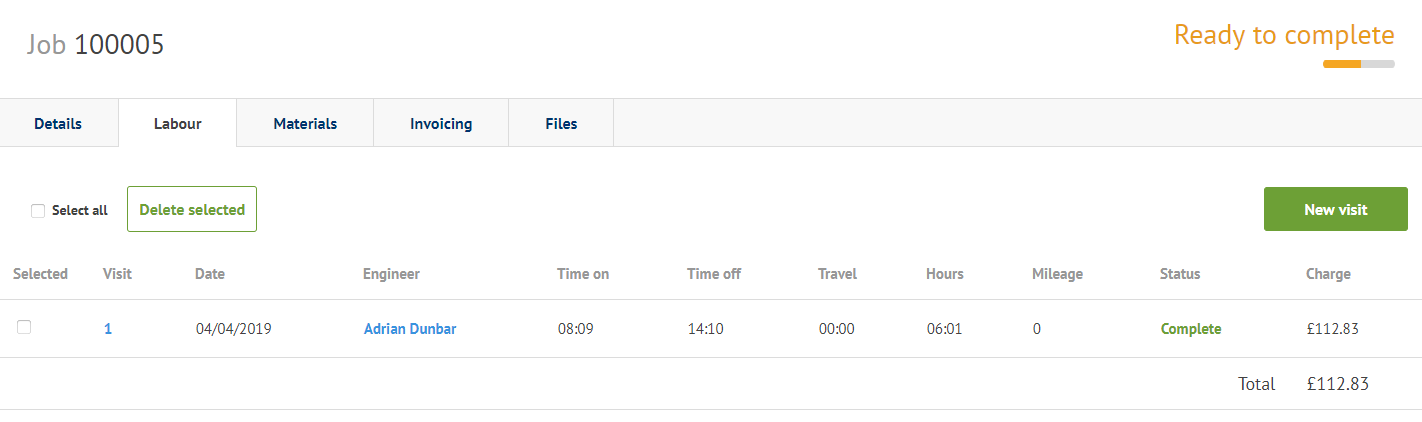
The Labor Tab
The Labor tab shows a summary of the labor expended on this job. You can see the visit number, the date, name of the technician, their time on & time off site, their travel hours & mileage, the current status of that visit, the labor charge amount and their work report. At the bottom of the summary you can also see a total labor charge.
If you need to edit any of the labor details you can do so in the following way:
- Click the blue ‘Visit’ number on the left of the session you wish to edit.
- The details screen opens.
- There are three tabs – Main, Charges & Signature (note that if Further Work has been identified by the engineer then this would appear as a fourth tab).
- On the main tab you can see the dates & times associated with this technician’s visit for reference purposes.
- To amend any of these dates & times you will need to click the ‘incomplete’ button first in the bottom left-hand corner and then complete the job afterwards. However, if you just need to amend the prices of the labor hours you can do this in the Charges tab without changing the actual hours the technician did.
- Go to the Charges tab.
- This tab allows to edit the hours & charge values for labor. You can amend the units, the rate, and multiplier or even add new lines.
- In the above screenshot you can see that the labor has been broken up into first hour, follow up hours, mileage & travel.
- Go to the Signatures tab.
- On the Signatures tab you can check both the customer’s and technician’s signatures captured via the mobile app for verification purposes.
The Materials Tab
This tab shows the materials that have been added to this job whether via an office user or via the mobile app. This summary shows you the technician who fitted these materials, the description of them, the type of material and the charge, with a total material charge at the bottom of the summary.
- To check any of the materials or to add prices to any up-priced lines simply click on the blue ‘Description’ field to open that line.
- Here you can see the details for this material line.
- To enter a price simply click into the Charge field and enter the value needed.
- Then click the green ‘Save’ button to save your changes.
Completing the Job
- Once you have checked the job to your satisfaction you are ready to complete the job. You can so this using the button at the bottom of the job screen regardless of the tab you are currently on.
- Click the ‘Complete job’ button. The status of the job goes to ‘Competed’.
Invoicing the Job
- Go to the Invoicing tab.
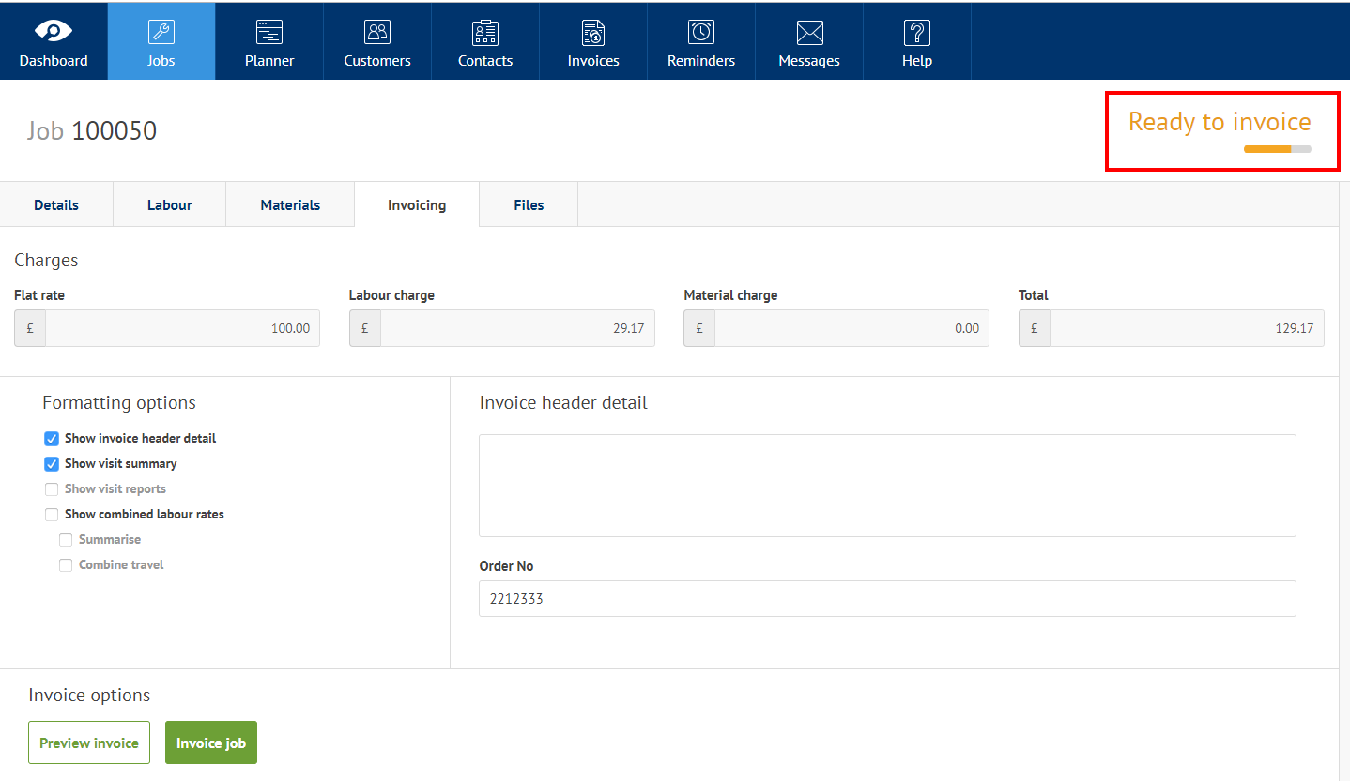
- If you are happy with the formatting options and how the invoice will appear for this job you can simply click the ‘Invoice job’ on the left to raise the invoice. However, you do have the option of previewing the invoice first allowing you to check the formatting, prices and so on prior to committing to the invoice itself.
- To do this you can use the ‘Preview invoice’ button instead.
- A preview invoice appears for you to check.
- If you want to alter the preview invoice click the green ‘Back to job’ button at the top right of the screen.
Formatting Options
The formatting options available can be set at job type level to save you time, or you can amend on a per job basis. They control what information appears on the invoice document.
Show Invoice Header Detail
This option controls whether or not the large free text field to the right of the options is displayed on the invoice or not. Tick the box to turn this feature on. This allows you to add free text to the invoice which will appear at the top of the detail section on the invoice.
Show Visit Summary
Summarizes the labor information so that rather than showing each visit individually the labor appears in one line. Note that if the labor is not summarized (see below) then the invoice will split the first hour, follow on hours, travel & mileage into four potential labor lines.
Show Visit Reports
This option displays each labor visit with the date, time on & time off as well as the technician’s report.
Show combined Labor Rates
Summarize
Turn on this option to reduce the labor line information to just one line for first hour & follow on hours. Note that travel will still appear separately unless ‘combine travel’ also turned on.
Combine Travel
Includes any travel hours in the same line as the on-site labor hours so that labor just appears as one line.
This invoice was created with ‘Show visit summary’, ‘Show combined labor rates’ & Summarize turned on which then reduces the labor element on the invoice to one line.
- Once you are happy with your invoice you can use the ‘Invoice job’ button to raise the actual invoice.
- A small window opens for you to confirm the tax date for the invoice. The default is today’s date. Click the green ‘Invoice job’ button.
- Once the invoice has appeared you can either print it off or, even better, email it to the customer.
- Click the ‘Email’ button at the bottom of the invoice.
- A screen appears with the email address of the recipient already populated. Also populated is the bcc address – if you have entered this in Settings | General | Settings (Sales invoice email copy to address). This means this address will receive a copy of the email when it is sent to the customer.
- You can also add a message and choose if you would like delivery and/or read receipts for this email.
- Click the green ‘Send’ button to email the invoice to the customer.